Showing posts with label Pinterest. Show all posts

November 29, 2012

Crockpot Ranch Pork Chops

Here's my latest Pinterest Recipe- Ranch Pork Chops


All you need for this is 

Pork Chops
1- Can of cream of chicken soup 
(original recipe says you can use 2 cans of cream of chicken or use 1 can and 1 can of water)
packet of powder ranch dip


Just combine all ingredients in crock pot. Cook on low for 4-6 hours. 

If I were you, I would mix the soup, water and ranch before adding the pork chops. I put the chops in first, but then it was a little difficult to mix up the other stuff. 


This isn't the best picture because I ate some first and then remembered I needed to take a picture. 


On the original recipe her sauce looks pretty thick. Mine, however, was very runny. I assume it's because I used a can of water instead of the 2 cans of soup. Next time, I will use 2 cans of soup and see if it's thicker.


Overall, the pork chops were very good and my family of 3 eaters ate all 7 pork chops (Mason does have 6 teeth, but he doesn't count yet)
November 28, 2012

Mexican Chicken Casserole

This week, when I did my grocery shopping I made my list from my pinterest food board so get ready for lots of recipes in the next week. First up is Mexican Chicken Casserole.


1 (10.75 oz) can cream of chicken soup
1 (10.75 oz) can cheddar cheese soup
1 (10.75 oz) can cream of mushroom soup
1 (4 oz) can green chilies
1 whole chicken, cooked, boned, and chopped or 4 cups leftover cooked chicken (I used cubed chicken, but it would of probably been better with shredded chicken)
11.5 oz package flour tortillas
2 cup shredded cheddar cheese


Preheat oven to 350 degrees.

In a large bowl, stir together the three kinds of soup, and chilies. Stir in the chicken.


In a greased 13 x 9- inch pan, layer the tortillas and the chicken mixture, beginning and ending with tortillas.


Sprinkle the cheese over the casserole and bake for 30 minutes.


I had two helping of this, but it wasn't my favorite. Mike told Marley this was probably the best thing I've ever made so apparently it is his new favorite!

November 26, 2012

Bottle Cap Stamp Craft

I'm always looking for ways to keep Marley occupied during the day. She could sit and watch tv or play her DS all day if we let her.  Saw this idea on pinterest and thought she would enjoy it since she loves to paint and draw. My aunt actually had the bottle caps, but they're just off milk and gatorade. Then I picked up the foam stickers at Wal-Mart for $1. At the time I wasn't really thinking, but I can't use all the letters because once you stick them on the caps and stamp with them, they are backwards- oops!  I did the letters I could and just let Marley play with the rest of the letters. 


Very easy, just stick the letters on the caps and voila! 


November 14, 2012

It's for the birds

Marley and I did a quick little craft project today after she brought home some bird food from school. (She had a field trip last week to Chesterton Feed & Garden and they gave each kid a bag of bird food).

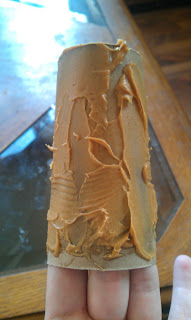
First, you need some used toilet paper rolls, peanut butter, bird food, something to spread peanut butter with, and something to lay the bird food out on.


I spread the peanut butter on the t.p. rolls first. I did it pretty thick for a few reasons, one- because I wanted the bird food to stick good, and two- I knew I wouldn't be using this jar of p.b. again so I figured I wouldn't waste it.


Next, I passed the roll off to Marley and she rolled it all over in the bird food. Making sure to smoosh it down good so the food sticks. 


That's it! Then we just bundled up and went outside and slid them over tree branches. We put them where we could see them from inside so Marley could watch them if a bird does come.


It took us about 10 minutes from start to finish and was free since I already had p.b. and t.p. rolls. 

November 12, 2012

Wax on, Wax off part 2

So now that I had my jar all clean it was time to make a "new" candle. (See how to clean your jar here)

First, I boiled some water. Once it was boiling, I just carefully set my old jars in the water and waited for them to melt.

I took my clean jar and my new wick and rigged up this little system to hold my wick in the middle and straight up while pouring the hot melted wax in.


After I poured the hot wax in, I placed it in the refrigerator so it would harden and started over with melting another candle.

I did this process for each old candle I had. My new candle has a nice stripey pattern to it and the house smelled really good from all the melted candles.


But now, I have a bunch of empty glass jars and I don't really know what to do with them. Does anyone have any ideas? Or should I just scour pinterest like I do for hours every night?

November 9, 2012

Wax on, wax off

I saw on Pinterest a few different ways to get that last little bit of wax out of your candle jars. I finally made it out to Hobby Lobby to buy some wicks, so I decided to give it a try. 


Here's all my "used" candles. My goal is to melt all the wax and combine it and make a new candle. 

First, I needed a clean jar. I had this one and it was pretty good size so I went with it. All you do is boil water on the stove. Once it's boiling for a few minutes, carefully pour it into the candle jar. Almost immediately you will see the wax on the bottle start to melt and float up to the top. It's pretty neat looking. 


Once it had all floated to the top I used a piece of metal to reach in and get the wicks out. And I stirred it a little just to help the remaining wax make its way to the top of the jar. (Be careful, it's very hot)


After a few hours, the water was cool and the wax on top was hard so it was time for the next step.


See how cool! (I was very excited that this actually worked)


I used a pencil to poke two holes in the wax so I could pour the water out. Then I cut the wax in half and pulled it out. I saved the wax to melt to use in my new candle. 


Cleaned the black stuff off the jar and made sure all the old wax was out and now it's like new and ready to become a candle again! 


Check out Part Two- making a new candle


Anyone have any other methods? I've heard of putting them in the freezer too, but have never tried it. Have you?

November 6, 2012

Chicken Lemon Rice Soup

 I absolutely LOVE chicken lemon rice soup! If I had to pick a favorite soup it's either potato or chicken lemon rice. However, I don't really love making it. It's a long process that involves lots of dirty dishes, but it's worth it. This time I decided to make a double batch and freeze some for later. (I'm always thinking ahead!) The recipe I'm posting is just for one batch , but I just doubled everything.


6 cups chicken broth
1 chicken flavored bouillon cube or 1 tsp instant chicken bouillon
1/3 cup uncooked white rice
1/3 cup chopped celery
1 cup cubed cooked chicken 
2 tbsp flour
3 tbsp lemon juice
1/3 cup diced carrots
1/4 cup finely chopped onions (I don't use these in mine)
2 tbsp butter
3 eggs
salt & pepper to taste

Makes 7 (1 cup) servings.


In large pot, combine chicken broth, bouillon, rice, carrots, celery and onion. Bring to a boil. Reduce heat. Cover and simmer 20 minutes or until rice and vegetables are tender. Stir in chicken. Remove from heat.


In small saucepan, melt butter. Slowly stir in flour. Cook for one minute, stirring constantly until smooth and bubbly. 


Gradually stir in 2 cups of previously made broth mixture. Cook until slightly thickened, stirring constantly. Remove from heat.

 In small bowl beat eggs until frothy. Gradually beat in lemon juice and 2 cups of the thickened broth mixture. 


Slowly add egg mixture to broth mix in the large pot, stirring constantly. (Add this very slowly and make sure your heat is on very low and keep stirring. If you add it too quickly and your heat is too high it will cook your eggs, and you'll end up with scrambled eggs in your soup)


Heat gently until soup thickens enough to coat a spoon, stirring frequently. Do not boil.


Salt and pepper to taste. 


Mike and I love this soup. Marley didn't care for it, but she's a weird kid! 

October 16, 2012

Chicken Tater Tot Casserole

I'm back for another Pinterest recipe dinner.  This recipe looked easy to make and I already had all ingredients in my freezer.


1 (32 oz.) bag frozen tater tots
                                                                                    1 (3 oz.)bag bacon pieces
       1 pound boneless, skinless chicken breasts, diced
2 cups shredded cheddar cheese
3/4 cup milk
salt & pepper, to taste


Place half of tater tots and 1/3 of the bacon bits into bottom of slow cooker/crock pot.


I didn't have any cheddar cheese, but if you did you would then put 1/3 of the cheese on top. Then add your chicken and salt and pepper. 


Add another 1/3 of bacon bits and 1/3 of the cheese (again, no cheese for me). Then rest of the tots and remaining 1/3 of cheese and bacon. 


Pour milk all over the top. 


Cover and cook on low for 4-6 hours. I have a fairly old crock pot and I cooked mine for 5 hours and it was perfect. 

I didn't have cheddar cheese, but I did have mozzarella that I added to the top once it was one cooking. 


I enjoyed this casserole, however, I don't think I will make it again. It was good but just seemed to be missing something. It seemed like it needed to be creamier. Mike added some ranch to his, but that didn't "fix" it for me. 


October 1, 2012

Chicken, Veggies, & Stuffing Casserole

This is another recipe that my mom used to make. Not sure where she got it from, but it's good!


1 package stove top stuffing
1 1/2 lb. chicken pieces
1 small can condensed cream of chicken soup
1 bag mixed veggies


Preheat oven to 400 degrees.

Prepare stuffing as directed on package. Set aside.


Mix chicken, soup and veggies in dish.


Top with stuffing.  Bake for 35 minutes.


Delicious! My favorite part is the stuffing.